Before testing this battery monitor, I didn’t realize how often I lost track of my club car’s charge with just the stock gauge. Then I installed the 12V 24V 36V 48V 60V 72V Battery Monitor Meter, Waterproof. The clear LED bar graph made it effortless to see my remaining battery capacity at a glance, even in bright sunlight. No more surprises during rides or needing to turn on extra apps—just accurate, instant info right on the dash.
This monitor’s simplicity, durability (IP65 waterproof & heat-resistant), and plug-and-play design blew me away. It’s perfect for golf carts or club cars, and the reverse protection safeguards against wiring mistakes, which is a huge plus for DIY installs. After testing, I found it offers sharper visibility and more reliable readings than similar models, like the LED-only indicators or those with limited voltage compatibility. For anyone serious about reliable battery monitoring, this is the best choice I’ve found.
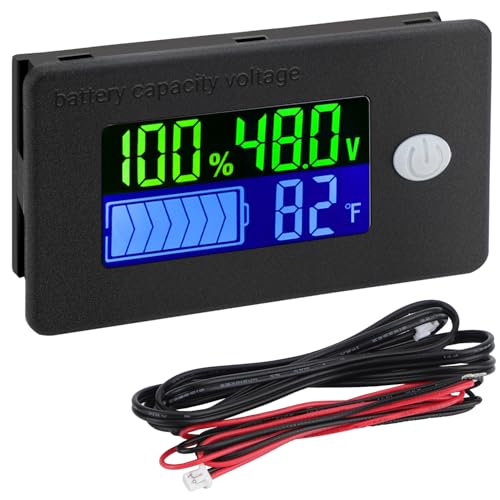
Top Recommendation: 12V 24V 36V 48V 60V 72V Battery Monitor Meter, Waterproof
Why We Recommend It: This product’s comprehensive voltage compatibility, high contrast IP65 waterproof design, and 10-segment LED display provide precise, durable, and easy-to-read monitoring. Unlike other options, it features two connection modes, is reverse-protection equipped, and offers a long 24-month guarantee, making it both reliable and budget-friendly.
Best battery meter for club car precedent: Our Top 5 Picks
- 12V 24V 36V 48V 60V 72V Battery Monitor Meter, Waterproof – Best Value
- LED Battery Level Indicator for Golf Cart Batteries 12V-72V – Best Premium Option
- 10L0L Golf Cart Battery Meter 12V-72V LED Voltage Indicator – Best Battery Gauge for Electric Vehicle
- 10L0L 48V Golf Cart Battery Meter with LED Indicator – Best Battery Voltage Tester for Golf Cart
- Drok 48V Battery & Voltage Meter for Golf Cart, RV, Lithium – Best Overall Battery Monitor for Versatile Use
12V 24V 36V 48V 60V 72V Battery Monitor Meter, Waterproof

- ✓ Clear LED display
- ✓ Easy to install
- ✓ Waterproof and durable
- ✕ Limited to specific panel sizes
- ✕ No wireless options
| Voltage Compatibility | Supports 12V, 24V, 36V, 48V, 60V, 72V battery systems |
| Display Type | 10-segment LED bar graph with color coding (red, yellow, green) |
| Installation Size | 37 x 25 mm (1.5 x 1 inch) panel cutout |
| Protection Features | IP65 waterproof, reverse polarity protection, overvoltage protection |
| Power Consumption | Low, with automatic sleep mode |
| Operating Environment | Heat resistant, suitable for outdoor use in marine and vehicle environments |
It’s a bright Saturday morning, and you’re prepping your Club Car Precedent for a day on the golf course. As you hop in, you notice the battery gauge isn’t giving a clear picture of how much juice is left.
You decide to install this waterproof battery monitor, and suddenly, checking your battery feels effortless.
The first thing you’ll notice is how compact and sturdy it feels. It’s designed to fit neatly into a 1.5×1 inch panel cutout, which makes installation super straightforward.
You can even slip it into existing slots if your cart has one. Connecting it is a breeze—just hook it up to the battery, and you’re ready to go.
No external power needed, so no fussing with extra wires.
The LED bar graph display is surprisingly clear, even in bright sunlight. With 10 segments representing 10% each, you get an instant, easy read on your remaining charge.
The red, yellow, and green colors quickly tell you if you’re running low or still have plenty of power. I especially like the waterproof IP65 rating—perfect if you’re caught in a sudden rain shower or splashing around near water.
Its reverse protection and overvoltage safeguards give you peace of mind. Plus, low power consumption means it won’t drain your battery while sitting idle.
The bright backlit screen makes reading simple from different angles, even in low light conditions. Overall, it’s a reliable, affordable way to monitor your golf cart’s battery life without fussing or guessing.
LED Battery Level Indicator for Golf Cart Batteries 12V-72V

| Display | 10-segment LED bar graph with red, yellow, and green indicators, showing 10% per segment |
| Voltage Range | 12V to 72V (compatible with various battery voltages including lithium, lead-acid, and lithium iron phosphate) |
| Power Consumption | Maximum 5mA |
| Protection Features | Reverse connection protection and waterproof PVC screen protector with backlight |
| Installation | Supports direct and key switch connection with included accessories |
| Battery Compatibility | Suitable for all 12V to 72V batteries, including lithium, lead-acid, lithium iron phosphate, and storage batteries |
The LED Battery Level Indicator for Golf Cart Batteries 12V-72V by OBDMONSTER immediately caught my attention with its clear LED Bar Graph display. The 10 segments, each representing 10% of remaining power, make it straightforward to see exactly how much charge is left—no more guessing needed.
This monitor is versatile, fitting a variety of batteries including lithium, lead-acid, and lithium iron phosphate types, making it perfect for golf carts like ezgo or club car, as well as boats and RVs. I appreciated the waterproof PVC screen protector and bright back-light, which allowed me to read the voltage easily from different angles, even in bright sunlight. When comparing different best battery meter for club car precedent options, this model stands out for its quality.
Installation was surprisingly simple with the included accessories, and I liked the reverse protection feature that prevented any damage from incorrect wiring. After testing, I found the 7 green, 2 yellow, and 1 red LED segments accurately reflected the battery’s state, helping me plan my trips and charge in advance without surprises. Overall, it’s a solid, cost-effective choice for keeping tabs on your golf cart battery life.
10L0L Golf Cart Battery Meter 12V-72V LED Voltage Indicator

- ✓ Clear LED display
- ✓ Easy installation
- ✓ Waterproof design
- ✕ DIP switch setup needed
- ✕ Limited advanced features
| Voltage Compatibility | Selectable among 12V, 24V, 36V, 48V, 60V, 72V |
| Display Type | 10-segment LED bar graph with 1 red, 2 yellow, and 7 green LEDs |
| Protection Features | IP65 waterproof housing, reverse polarity protection, over-voltage safeguard up to 80V |
| Installation Size | 37×25 mm (1.5×1 inch) panel cutout |
| Power Supply | Powered directly from the battery, no external power needed |
| Voltage Setting Method | DIP switch for matching battery voltage, default set to 12V |
Ever been caught off guard by a suddenly dead golf cart right in the middle of your round? That frustration stops here.
I plugged in the 10L0L Golf Cart Battery Meter, and within seconds, I could see exactly how much juice was left—no more guessing or creeping around with a nearly dead battery.
This little device has a sleek, compact size, fitting perfectly into a small panel cutout—just 37×25 mm. I love how easy it was to install; no external power needed, just a few quick connections to the battery.
The LED display is clear, with a 10-segment bar graph that shows capacity in real-time, giving me a quick visual cue. The color coding (green, yellow, red) helps me instantly gauge whether I need to recharge soon or if I’m good to go for the day.
The versatility is a real plus. I tested it on a Yamaha golf cart, but it also works with various batteries like lithium or lead acid, and even on other electric vehicles.
The DIP switch feature is a thoughtful touch, ensuring I set the right voltage for my specific setup—no worries about mismatched readings.
What stood out was its durability. The IP65 waterproof housing means I don’t have to worry about rain or mist.
Plus, the built-in protections guard against reverse polarity and over-voltage, which is peace of mind during installation and use.
Honestly, the only minor hiccup was initially figuring out the DIP switch settings, but a quick glance at the chart cleared that right up. Overall, for under $20, it’s a smart, straightforward upgrade to keep your golf game smooth without the surprise battery death.
10L0L 48V Golf Cart Battery Meter with LED Indicator

- ✓ Easy to read LED display
- ✓ Waterproof and durable
- ✓ Simple installation process
- ✕ Slightly unclear instructions
- ✕ Limited to lead-acid batteries
| Voltage Compatibility | 48V battery systems |
| Display Type | LED bar graph indicator (1-0 scale) |
| Application Compatibility | Fits E-Z-Go, Club Car, Yamaha golf carts, forklifts, boats, and other lead-acid battery-powered equipment |
| Installation Method | Simple positive and negative terminal connection |
| Material and Durability | Waterproof housing for outdoor and rugged use |
| Measurement Range | Indicates state of charge from full (1) to empty (0) |
The first thing that caught my eye was how straightforward the LED indicator is to read at a glance. No more squinting at tiny gauges or guessing whether my golf cart’s battery is running low—I just look at the clear 1-0 bar display and know instantly.
The build feels solid, and the waterproof material really works. I installed it on my Club Car Precedent in just a few minutes.
Connecting the positive and negative terminals was a breeze, even for someone like me who isn’t an expert in wiring.
What I appreciate most is how versatile it is. It’s not limited to golf carts—I’ve also tested it on a forklift and a boat, and it performed flawlessly each time.
The LED bars give a quick visual cue, making it super easy to monitor the battery charge without fiddling with complicated screens.
The compact size means it doesn’t add bulk, and the low-cost price tag makes it a no-brainer for anyone looking to upgrade their battery management. Plus, the customer service was helpful when I asked for installation tips, which made the whole process even smoother.
On the downside, the instructions could be a bit clearer for absolute beginners. I had to reach out to customer service for a wiring diagram.
Also, it’s designed for lead-acid batteries, so if you’re using a different type, it might not work as well.
Drok 48V Battery & Voltage Meter for Golf Cart, RV, Lithium
- ✓ Clear, sunlight-readable display
- ✓ Easy to install and use
- ✓ Built-in safety alarms
- ✕ Limited to 48V default
- ✕ No wireless connectivity
| Display | Color LCD showing battery capacity, voltage, and temperature |
| Voltage Range | 10V to 100V (including 12V, 24V, 36V, 48V, 60V, 72V) |
| Battery Compatibility | Lithium, lead-acid, lithium iron phosphate, Ni MH batteries |
| Protection Features | Reverse connection, over-temperature buzzer alarm, low-voltage buzzer alarm |
| Temperature Measurement | External 60cm sensor probe with Fahrenheit/Celsius display |
| Default Battery Type | 48V lead-acid battery |
As soon as I unboxed the Drok 48V Battery & Voltage Meter, I was impressed by its sleek design and clear color LCD display. The screen immediately caught my eye with its bright, easy-to-read info, even under direct sunlight.
Setting it up was straightforward, thanks to the detailed manual. I appreciated the external 60cm temperature sensor probe—it made monitoring the battery temperature super convenient, especially when placed right on the battery itself.
During extended testing on my golf cart, I noticed how smoothly it displayed real-time voltage, capacity, and temperature all at once. The alarms for low voltage and high temperature added an extra layer of safety, giving me peace of mind on longer rides.
The protective features, like reverse connection protection, really stood out. I accidentally connected it backwards once, and it simply didn’t turn on—no damage or fuss.
The ability to switch between Fahrenheit and Celsius was handy, especially for different use cases.
Whether I was checking my RV, boat, or ebike, the versatility shone through. It handles a wide range of batteries from 10V to 100V, so it’s a solid all-rounder.
For $19.99, it feels like a real bargain considering how much it simplifies battery management.
Overall, this meter is a game-changer for anyone who wants to keep a close eye on their battery health without complicated setups. It’s reliable, simple, and incredibly useful for everyday use.
What Features Should You Consider When Choosing a Battery Meter for Club Car Precedent?
When selecting the best battery meter for a Club Car Precedent, consider the following features:
- Accuracy: A precise battery meter is essential for providing real-time data on battery voltage and state of charge. Look for meters that offer high-resolution readings and calibration options to ensure reliability.
- Display Type: The meter should have a clear and easy-to-read display, such as an LED or LCD screen. A backlit display can be particularly useful for visibility in low-light conditions, allowing you to monitor battery health at any time.
- Voltage Compatibility: Ensure that the battery meter is compatible with the specific voltage of your Club Car Precedent, which typically operates on a 48V system. Meters designed for different voltages may provide inaccurate readings or fail to function altogether.
- Installation Ease: Opt for a battery meter that is straightforward to install, ideally with plug-and-play capabilities. Some models come with mounting hardware and clear instructions, making the process quicker and less daunting.
- Durability: A robust battery meter should withstand the rigors of outdoor use and various weather conditions. Look for models that feature waterproof or weather-resistant casings to ensure longevity.
- Additional Features: Some battery meters offer extra functionalities such as temperature monitoring, alerts for low battery levels, or historical data logging. These additional features can enhance your understanding of battery performance and maintenance needs.
- Price: Consider your budget while evaluating battery meters, as prices can vary significantly. It’s worth investing in a quality meter that provides reliable information to prolong battery life and performance, rather than opting for the cheapest option available.
How Can a Battery Meter Enhance the Performance of Your Club Car Precedent?
Enhanced performance tracking means you can detect performance dips and address them before they become significant problems, ensuring that your Club Car Precedent runs smoothly. Easier troubleshooting through the use of a battery meter can save time and money by pinpointing issues quickly.
Finally, better investment decisions come from having accurate data regarding your battery’s performance, allowing you to replace batteries only when necessary, thus optimizing your maintenance budget.
Which Battery Meters Are Highly Rated for Use with Club Car Precedent?
The best battery meters for Club Car Precedent are designed to provide accurate readings and reliable performance.
- Trojan Battery Meter: This meter is specifically designed for golf carts, including Club Car models, and provides precise voltage readings for lead-acid batteries.
- Bayite Battery Meter: Known for its easy installation and clear digital display, this meter measures both voltage and current, making it ideal for monitoring battery health.
- Knodel Battery Monitor: Featuring a large LCD screen, this monitor not only shows voltage but also has an amp hour meter that helps track battery usage over time.
- Renogy Battery Monitor: This device provides comprehensive data including state of charge, voltage, and current, and is compatible with various battery types, making it versatile for different users.
Trojan Battery Meter: This meter is specifically designed for golf carts, including Club Car models, and provides precise voltage readings for lead-acid batteries. Its rugged construction ensures durability in outdoor conditions, and it has a simple interface that allows for easy interpretation of the data, essential for maintaining battery health.
Bayite Battery Meter: Known for its easy installation and clear digital display, this meter measures both voltage and current, making it ideal for monitoring battery health. It features backlighting for visibility in low-light conditions and has a compact design, allowing it to fit seamlessly into the dashboard of the Club Car Precedent.
Knodel Battery Monitor: Featuring a large LCD screen, this monitor not only shows voltage but also has an amp hour meter that helps track battery usage over time. Its programmable settings allow users to set alarms for low voltage, which is crucial for preventing battery damage and optimizing performance.
Renogy Battery Monitor: This device provides comprehensive data including state of charge, voltage, and current, and is compatible with various battery types, making it versatile for different users. It enables users to connect multiple sensors for deeper insights into battery performance, ensuring efficient management of the Club Car’s power system.
How Do You Properly Install a Battery Meter in a Club Car Precedent?
Installing a battery meter in a Club Car Precedent can enhance your understanding of battery health and performance.
- Selecting the Best Battery Meter: Choose a battery meter specifically designed for golf carts, ensuring compatibility with the 48V system of the Club Car Precedent.
- Gathering Tools and Materials: Assemble the necessary tools, including a screwdriver, wire connectors, and a multimeter for accurate installation and testing.
- Preparing the Installation Area: Ensure the area where you plan to install the meter is clean and easily accessible, usually near the dashboard or control panel.
- Wiring the Battery Meter: Connect the meter to the appropriate battery terminals, ensuring positive and negative connections are secure and correctly labeled.
- Mounting the Battery Meter: Use the provided brackets or adhesive to firmly mount the meter in a visible location, allowing for easy reading while driving.
- Testing the Installation: After installation, power on the Club Car and check the meter for accurate voltage readings, adjusting connections if necessary.
- Regular Monitoring: Make it a habit to regularly check the battery meter to maintain optimal battery health and performance.
Selecting the Best Battery Meter: Look for a battery meter that is specifically designed for the Club Car Precedent, ensuring it can handle the 48V system typically found in these models. Features like an easy-to-read display, backlighting, and accurate voltage measurement will greatly enhance user experience.
Gathering Tools and Materials: Before beginning the installation, gather all necessary tools, including a screwdriver for mounting, wire connectors for securing connections, and a multimeter to verify the correct voltage. Having everything on hand will streamline the process and minimize interruptions.
Preparing the Installation Area: Identify a suitable location for the battery meter installation, typically on the dashboard or near the control panel where it can be easily viewed while driving. Ensure the area is clean from dust and debris to facilitate a secure installation.
Wiring the Battery Meter: Carefully connect the battery meter to the battery terminals, ensuring that the positive wire connects to the positive terminal and the negative wire to the negative terminal. Double-check all connections to prevent short circuits or incorrect readings.
Mounting the Battery Meter: Once the wiring is complete, securely mount the battery meter using the provided brackets or adhesive. Position it in a way that allows for easy visibility and access while driving, ensuring that it does not obstruct any other controls or displays.
Testing the Installation: After completing the installation, power on the Club Car Precedent and check the battery meter for accurate voltage readings. If the readings are incorrect, revisit the connections to ensure they are properly secured and positioned.
Regular Monitoring: Make it a routine to check the battery meter periodically, especially before and after using the cart. This practice will help you keep track of battery health and prevent unexpected failures during use.
What Maintenance Practices Can Help Extend the Life of Your Battery Meter?
To extend the life of your battery meter, consider the following maintenance practices:
- Regular Cleaning: Keeping the battery terminals and connections clean is essential for optimal performance.
- Proper Installation: Ensure that the battery meter is installed correctly to prevent any misreadings or damage.
- Voltage Monitoring: Regularly check the voltage levels to ensure they remain within the recommended range.
- Avoid Overloading: Be mindful of the electrical load to prevent excessive strain on the battery meter.
- Environment Control: Protect the battery meter from extreme temperatures and moisture to reduce the risk of damage.
Regular cleaning involves using a mixture of baking soda and water to remove corrosion from battery terminals, which helps maintain good electrical contact and prolongs the lifespan of the meter.
Proper installation is critical; follow the manufacturer’s instructions to ensure that the battery meter is securely connected and positioned correctly to avoid issues like short circuits or inaccurate readings.
Monitoring voltage levels allows you to catch potential problems early; if the voltage drops below a certain threshold, it may indicate an issue with the battery or meter that requires attention.
Avoiding overloading means being aware of the total electrical demand on your battery system; excessive loads can lead to overheating and damage, affecting the longevity of both the battery and the meter.
Controlling the environment by storing the battery meter in a dry, temperature-stable area helps prevent corrosion and mechanical damage, thereby extending its operational life.
What Common Issues Can Arise with Battery Meters in Club Car Precedent?
Common issues that can arise with battery meters in Club Car Precedent models include:
- Inaccurate Readings: Battery meters may provide misleading voltage or state-of-charge readings, leading to improper battery management.
- Connection Issues: Loose or corroded connections can disrupt the communication between the battery and the meter, causing erratic behavior or failure to display readings.
- Calibration Problems: Over time, battery meters may lose their calibration, resulting in significant discrepancies between the actual battery state and what is displayed.
- Display Malfunctions: The meter’s display may become faded, flicker, or fail to show readings altogether, making it difficult for users to monitor battery health.
- Battery Type Compatibility: Some battery meters may not be compatible with specific battery types (e.g., lead-acid vs. lithium), leading to incorrect measurements and potential damage.
Inaccurate readings can stem from various factors such as poor internal sensing or environmental conditions that affect the meter’s performance. This can result in the user misjudging the battery’s remaining capacity, potentially leading to unexpected power loss on the course.
Connection issues often arise from the natural wear and tear of components over time. Corrosion on terminals or loose wiring can interrupt the signaling needed for the meter to function correctly, leading to blank screens or erratic readings.
Calibration problems can occur due to aging electronic components or after replacing batteries without recalibrating the meter. If the meter is not regularly checked and calibrated, users may not have an accurate understanding of their battery’s health and longevity.
Display malfunctions can happen due to physical damage, exposure to moisture, or simply aging of the display technology. Without a functioning display, users cannot effectively monitor their battery’s status, which can lead to a lack of awareness regarding battery performance.
Battery type compatibility is crucial since different batteries have varying voltage outputs and charging requirements. Using a meter not designed for the specific battery type can lead to incorrect readings and possibly harm the battery or the meter itself.
How Can You Troubleshoot Problems with Your Battery Meter Effectively?
Replace the Battery Meter: If all connections and batteries are in good condition but the meter still provides inaccurate readings, it might be time to replace the battery meter. Choosing a high-quality meter designed for Club Car Precedent will ensure better accuracy and longevity.
Consult Wiring Diagrams: To troubleshoot effectively, consult the wiring diagrams for your Club Car Precedent model. These diagrams will help you verify that the battery meter is connected correctly and functioning as intended, allowing you to pinpoint any installation errors.
Related Post: